Starting Zim IDE
Documentation | Blog | Demos | Support
Starting Zim IDE
5 out of 5 stars
1 rating
| 5 Stars | 100% | |
| 4 Stars | 0% | |
| 3 Stars | 0% | |
| 2 Stars | 0% | |
| 1 Stars | 0% |
Zim IDE can be started in two different ways:
1) Starting Zim IDE from Zim Thin Client
You may invoke Zim IDE directly from Zim Thin Client or Zim QT (both only in Zim 9.00):
Zim IDE will initialize using the database connection from your current Zim Thin Client or Zim QT session.
2) Starting Zim IDE Directly
From the Zim installation directory, execute or double click on the file ZimIDE.exe
Alternatively, you can also click on a Zim shortcut:
on the Desktop;
on the Quick Launch tool bar;
by selecting on Start → (All) Programs → ZIM → Zim 9.00 (or Zim 7.21) → Zim IDE
Since Zim IDE is not starting from an existing Zim Thin Client or Zim QT session, all the necessary connection information needs to be provided.
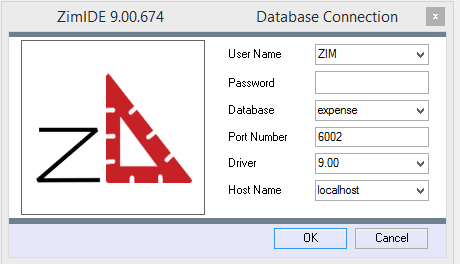
The following window will de presented when ZimIDE.exe starts.

Where:
| User Name | User name from “users” table in the Zim database. “ZIM” is default user. |
| Password | Password for user. Default “ZIM” user has no password. |
| Database | Logical name of the database you are connecting to as it is defined in the file zimdb.zim, located in the ZIM install directory. |
| Port Number | Port that Zim Server is listening on. The default port for Zim 9.00 is 6002, the default port for Zim 7.11 is 5001.. |
| Driver | Select the driver version that matches the version of Zim that you are using. |
| Host Name | The IP Address or name of the computer that is hosting Zim Server. You can use “localhost” if Zim Server is running on the same machine as Zim IDE. |
5 out of 5 stars
1 rating
| 5 Stars | 100% | |
| 4 Stars | 0% | |
| 3 Stars | 0% | |
| 2 Stars | 0% | |
| 1 Stars | 0% |