Single Person Development Projects

All the ZOM services and features and development approaches mentioned above also apply to single-person development projects as well. In fact, these can be applied to your advantage anytime development is spread across multiple development environments regardless of the number of people involved.

For example, there are often several versions of an application representing various releases and stages of development. ZOM can be used to co-ordinate changes between these versions.

Another case is an application being developed for several different computer systems. For example, an application being developed for UNIX and Windows simultaneously, with UNIX being the primary development site. The developer(s) can use ZOM to synchronize the two environments using the same methods described above.

The Peer-to-Peer Development Approach

Another common approach to team development projects is to maintain separate development environments for each developer and synchronize the development environments from time-to-time by merging changes from one environment directly into another. This approach is referred to as peer-to-peer development.

Peer-to-peer development is similar to master-slave development except there is no master environment. Each development environment exchanges information directly among one another. For example, if Steve and Carol from our master-slave scenario were instead operating in a peer-to-peer environment, they would import changes directly from one to the other rather than into the master.

The mechanisms provided by ZOM to support peer-to-peer development are the same as those for master-slave development as shown above. The only significant difference is that changes are merged directly into another development environment rather than a master environment.

Verifying Imported Objects before Merging

To gain more control when importing objects, you can import objects first into a “staging area” to verify the incoming objects before bringing them into the application proper. ZOM provides a staging area called the “Shadow Object Dictionary” which is a mirror image of the Zim Object Dictionary. Once in the Shadow Object Dictionary, you can request a report comparing the imported objects with the existing application objects. This enables you to review the incoming objects before actually merging them with the application. Use the following commands:

ZOMImport ;t SH

ZOMDiff ;d DiffRpt

Using Locks for Change Control

Combining ZOMImport and ZOMExport with keywording and object locking can give you a great deal of control over the management of the application as a whole. Let’s assume that the master is to receive Steve’s work, but needs to protect the application from any changes that Steve has made outside his defined task of user interface design. In the master environment, the following example unlocks all objects, then locks all objects except forms, displays and windows before importing objects from Steve.

ZOMSet * ;p l!

ZOMSet * -t Form,Disp,Win ;p l

ZOMImport

Usually a developer is not confined to specific types of objects, but rather to subsets of the application. If Steve were given the job to maintain the Inventory system, for example, we could lock everything except the Inventory system prior to import:

ZOMSet * ;p l!

ZOMSet * -k Inventory_System ;p l

ZOMImport

If you have the potential for conflicting updates from different developers, you should take steps to control or prevent conflict. One of the most straightforward methods is to keyword the objects when exporting from a development environment such that the keyword indicates the environment they were exported from, as shown in the following example:

ZOMExport +k $new,$changed ;k Steve_Env

This keyword is retained with the exported object descriptions, so when the objects are imported into the master, they retain this keyword.

As each developer’s work is imported, all previously imported work is locked as well by executing a lock against their keyword. Thus, when importing Carol’s work, execute

ZOMSet * ;p l!

ZOMSet * -t Ent,Rel,Role +k Steve_Env ;p l

These commands start by unlocking all objects. Then a lock is placed on all objects except for EntitySets, relationships, and roles but including objects keyworded with “Steve_Env”.

Master-Slave Development Approach

A typical configuration for projects involving multiple developers is separate development environments for each developer and a master environment that contains the combined results of the project team. This development approach is referred to as master-slave development. Each developer’s environment is called a “slave” to the “master” environment. From time to time, a developer merges his or her changes into the master environment and then resumes development, usually continuing with a copy of the updated master environment.

The master/slave approach has several benefits:

  • Developers can work at their own pace since each development environment is independent of every other slave development environment.

  • Catastrophic mistakes can be isolated to each developer’s environment and not affect other developments or the master.

  • Developers need not work on the same computer or even the same computer system or network. For example, development can take place on several PC’s without requiring a network. Or developers can work in a heterogeneous computing environment, with members of the development team working on a mixture of operating systems (e.g., UNIX, Windows, and so on.).

  • Object and data model modifications can be centrally controlled by controlling access to the master environment.

  • Version control can be centralized on the master environment.

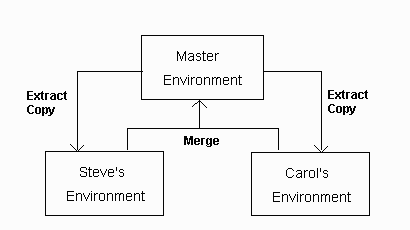
As a simple example, assume there are two developers, Steve and Carol, developing parts of the same application. Steve is working on user interface design, while Carol is working on the data model. Each has a “slave” copy of the application, and there is a third environment representing the “master” version of the application. As discussed above, it is essential that each environment have its own unique environment code.

Sample Master/Slave Environment

Steve and Carol each work on the application, making various additions, deletions and changes. Steve changes two forms, fEmpl and fCorp, and creates a new one, fProj. Carol has revised the Employees EntitySet, and added a new relationship, WorkAt. They have both decided to merge their developments into the master environment.

Merging Changes

Merging changes from one development environment into another is done by exporting the changes from the first (i.e., source) environment using ZOMExport and then importing these changed objects into the second (i.e., target) environment using ZOMImport. The import process compares the incoming objects from the source environment with the objects in the target environment. New objects are created in the target environment. Changed objects are reflected in the target environment, taking into account any existing objects and dependencies with other objects.

Returning to the master-slave development example, assume that Steve is to merge his changes into the master environment first. Also, assume Steve has ZOM configured with the default new keyword, “$new”, and the default changed keyword, “$changed”. These two keywords then identify all new and changed objects in his development environment. These are the objects to be merged into the master environment.

Note: There are several variations of how ZOMExport and ZOMImport can work together. This is the most basic.

Note: ZOMExport and ZOMImport always save/load definitions to/from a directory called port beneath the DB directory.

To merge, Steve performs the following steps:

  1. Extract the new and changed objects from the slave environment using the ZOMExport command and the new keyword and changed keyword:

ZOMExport + k $new,$changed

The “+k $new” selects all new objects, while the “+k $changed” selects all changed objects. These objects are exported in the normal manner by ZOMExport. Thus, in Steve’s case, the two forms he changed, fEmpl and fCorp, and the new form he created, fProj, are exported.

Now, Steve should remove the new and changed keywords. In this way, the next time, Steve exports only objects created or changed since the last time he exported.

ZOMSet +k $new,$changed ;k$new! ;k$changed!

  1. Move the files containing the exported objects to the master environment.

ZOMExport creates a series of files whose names are suffixed with “.z50”. To move the objects from Steve’s environment to the master environment, first delete any files with the “.z50” suffix from the master environment, then copy the “.z50” files from Steve’s directory to the master environment.

For example, if Steve is working with Windows, Novell, or MS-Net and his development environment is stored in the directory C:ZimAPPSTEVE and the master environment is store in the directory C:ZimAPPMASTER, then Steve would execute the following commands:

del c:zimappmasterport*.z50

copy c:zimappsteveport*.z50 c:zimappmasterport

Under similar circumstances in a UNIX environment, Steve would execute:

rm /zimapp/master/port/*.z50

cp /zimapp/steve/port/*.z50 /zimapp/master

  1. Import the objects from the slave environment into the master environment by invoke the ZOMImport command in the master environment:

ZOMImport

ZOMImport imports the objects from the files produced by ZOMExport. These objects are loaded into the Object Dictionary and created.

The process can be repeated for Carol.

If Steve and Carol have been working on different parts of the system, their changes merge into the master environment without conflict. If, on the other hand, there are conflicting changes, then some of Carol’s updates can overwrite Steve’s. If there is the potential for conflict, there are a number of ways to control or prevent trouble using ZOM. The most straightforward methods involve use of keywords and locks.

Note: The master-slave development scenario includes the situation where the master environment represents the current “production” application and the slave environments represent ongoing developments. This scenario also applies to single person projects as well.

Configuring ZOM for Team Development

When working on a team development project, you should first adjust the configuration of ZOM for each development environment so that objects from the various environments can be easily identified. The three configuration options of importance here are the environment code, the new keyword, and the changed keyword. You configure ZOM using the ZOMConfig command.

Each development environment should be assigned a unique ZOM environment code. This guarantees all objects are registered with object keys (i.e., ObjectKey property) that are unique across all development environments. In other words, no two objects are ever assigned the same object key even though they might have been created in different development environments.

For example, you could assign environment codes based on your initials, followed by a serial number: “NICK01”. When a developer creates a new environment, the serial number assigned in the environment code could be incremented (e.g., “NICK02”, “NICK03”, and so on.).

If you do not assign an environment code, ZOM generates a random environment code for you. The randomization is designed to make duplicate environment codes unlikely.

There are two other ZOM configuration options that are useful in team development projects. The new keyword option specifies a keyword that is automatically assigned to all newly registered objects. The changed keyword option specifies a keyword that is automatically assigned to all objects you change (e.g., re-create, rename, move, erase, delete, compile, and so on).

The new keyword and changed keyword give you a convenient way to keep track of which objects are new or changed in your environment. You can reset the value of these keywords at any time using the ZOMConfig command and easily remove them from your objects using the standard ZOM key-wording services.

For example, you assign the new keyword and changed keyword to “NewObjs” and “ChangedObjs”, respectively. You are then able to retrieve all new and changed objects in your environment using the keyword selection criteria:

ZOMList +k NewObjs

ZOMList +k ChangedObjs

If you would like to reset your environment so that no objects are flagged as new or changed, use the standard ZOM keywording services:

ZOMSet +k NewObjs ;k NewObjs!

ZOMSet +k ChangedObjs ;k ChangedObjs!

By default, ZOM is configured with the new keyword as “$new” and the changed keyword as “$changed”.

Team Development Projects and ZOM

ZOM provides services and features to support multi-person development teams. These capabilities can be used to identify and track changes, control changes, exchange changes between environments, and merge developments from one environment into another.

ZOM supports various development methodologies. Some of these are described in the following topics; however, ZOM can be applied in many ways to support other methodologies including customized approaches.

pt_BRPortuguese